Tuesday, December 10, 2013

Wood Stove Reco Fan (Build #2)
Unknown3:19 PM

fan-working-on-stove-iPhoneBuild #2 The second build was a success. It was based on the Instructables guide by the author "tinkerme". After reading the guide, I had a hankering to try again.

**Parts List**
Hot side:
- a passive aluminum heat sink from a Power Mac G4 466
It's roughly 3" wide by 6" long, lots of fins. The raised part for the chip, was cut off with a hacksaw and ground down. Upgrade: concerned the heat was slipping through the outside fins. Put a shroud around the hot side of the cooler. This would prevent the loss, and gather the heat. Found an aluminium control box from a washing machine. The shroud also prevented the heat from reaching the Thermalright cooler fins.
- little 1-1/2" x 1-1/2" square piece of copper. It was used as a spacer/transfer sat of heat to the peltier module. Use a copper pipe, cut length wise, pound flat and buffed up on the grinder.
- Peltier module (90 watts, ebay@$19.00) Model TEG1-12710 Note: click here for a good web site about Peltier markings     - 40mm x 40mm x 3.3mm  
  - Power input from 0-16 volts DC and 0-10.5 amps (when used as a thermoelectric cooler)
  - Operates at temperatures as high as +350 deg F  
  - Fitted with 6-inch insulated leads  
  - Perimeter sealed for moisture protection

Zalman's cooler paste **A must have. This grey goop was cheap and was included with most CPU heatsink kits. It really increased the heat transfer and the voltage.
Thermalright CPU Cooler Rated for a 120mm fan. Aluminum base. Well made heat sink

- 1.5 to 3.0 Volt DC Hobby Motor **A must have. The earlier motor, needed a couple of volts to get running. But, hobby motor required 1.5 volts to start. So, I broke the "made-from-junk" rule and bought a small hobby motor for The Source (Radio Shack) @ $4.99 *Note: a standard 4" computer fan didn't work. Not sure how other people can get theirs going?

 Props
  - The homemade, 2 blade, prop works OK, but the motor gets only up to .23 volts. Plan to work on it and make improvements
- the cooling fan from a blender gets up to .43 volt, but doesn't push air at a lower RPM
- made a fan blade from a coffee can bottom, works good, lots of shake
- A plastic, 4 blade exhaust fan blade works the best. The only bummer was it's made from plastic and could melt. So, made a heat shield for the bottom.

Testing
- Had it successfully working on the December 7th weekend during a record cold snap. Since it was minus 32° Celsius (-25° Fahrenheit) outside, I had the wood stove wide open running as hot as I could.
- Noticed the fan blades started to turn when the wood stove hit 100° Celsius (212° Fahrenheit) 
- Once I realized it was turning the wrong way, I reversed the positive and negative leads. It started to push the cold air through the fins and out the other side.
 

Wednesday, August 14, 2013

Build Three of Vertical Axis Wind Turbine (VAWT) from Cedar Wood Siding
Unknown11:47 AM

This is the third version of the vertical axis wind turbine (VAWT) made from cedar siding lumber. It’s very close to the Lenz style of VAWTs. These type of wind turbines are fun to build. Lots of room for improvements and coming up with new ideas.
For example:
- the hubs with bearings, came from my portable generator. Had a handy grease spout that could easily be greased with a grease gun
- the struts for the scoop (Lenz style) of blades were extended to clear the garage door style generator
- Used boiled linseed oil to seal the wood parts. The stain lasts forever and works great against the sun
- Did a quick test on top of our house, but, nothing really happened. (The motor garage door motor was not hooked up) The wind is quite poor in our residential area. Plus, without the aid of mirrors or a surveillance system, it’s difficult to see it spin when it’s right on top of your house
- The VAWT was designed to be mounted on top of a tree a off-the-grid cabin
- At the moment, the garage door motor on it, but, it does not turn well with the belt-pulley system. The wind really needs to be blowing. I thinking about going the magnet and coil route
- Had to take it down after 5 days of testing. A certain neighbours started to ask questions and I didn't want the bylaw officer give me a ticket for having a structure on the roof.


Wednesday, May 29, 2013

Installing a RV Refrigerator into a Cabin
Unknown11:36 PM


With the summer fast approaching, the quest for cold beers and the ability to store food for longer periods would definitely keep the family happy and increase the moral. Therefore, the propane RV refrigerator project shot up to the top of the list.

Prior to the propane fridge, we had a 12 volt Mobicool thermoelectric cooler. On hardware store shelf, it looked ideal for my humble 12 volt solar system and didn't seem to draw a lot of amps. It cost around $100 dollars and was easy to move. But, the downside, it had to run all the time, 24 hours a day! In about a day, it would drain the four 6 volt golf car batteries down to dangerous levels. I'd have to run the generator to charge the batteries back up. It was a waste of fuel and time.  We ended up disconnecting it and use it as cooler with blocks of ice.

The next plan was a small refrigerator that would be used in a dorm room or under a bar, It ran only on AC current, but, we estimated it needed about 175 watts to run on the lowest setting. It worked without problems in the summer months and it was exciting to see it running full-time off my solar panels system. But, as the sun got lower in the sky, I noticed it started to draw more current and drain the batteries. Luckily the AC inverter had a low power setting and shut off the power before the batteries were damaged.

Wall modified for RV fridge 
One day, a good neighbour dropped off an old Dometic 12 Volt or propane refrigerator. He had upgraded to a bigger model in his cabin and wasn't using the smaller one. What a treat! Since I was new to propane appliances  I was a little leery about bringing it inside. So for the first year, it was out on the back deck working. My spouse made a few subtle comments about it looking a little junky for the neighbour. So, I decided to bring it indoors.

The only problem with the smaller style of RV refrigerators is that it needs to be inserted into a cabinet. The plan was to install it into a nifty wall/pantry unit, but, there just wasn't enough time to build it. I suggested that we go to IKEA and check out the "As Is" section for any cabinets or wall units that were big enough. Ended up finding a pantry unit with a couple of dents, but the price was right and was perfect for the space.

Before any building, I went online a found a Dometic Installation and Operation Manual. An excellent guide with diagrams for 5 different Dometic models. For example, on page 16, there is a Technical Data chart giving overall and recess dimensions, capacity, weight, electrical data (watts) and LP gas data. very handy! 

RV refrigerator can sit in a cabinet, but the chamber behind the cooling
Chamber covered with flashing
elements had to be made from non-combustible material. Went to my hardware store picked up some wall flashing and furnace ducting.
The plan was to make a box in a box approach. That way, if I did need to service the RV refrigerator, it could simple slide out of the chamber. The installation manual had all the measurements and I made a simple box out of plywood,
After assembling the IKEA pantry unit, I measured for the height of the plywood box and adjusted the shelf it was to sit on. Added a few more boards to the shelf for extra strength.
After the RV fridge was hoisted up and on to the pantry shelf, I went around the back and did some more measurements for a ventilation chamber for the wall.
Since the cabin wall behind the fridge was not insulated yet, it was easy to trim the boards and build a frame. It looked like a window frame, accept there was no hole for a window. Once the lower, upper vents, hole for propane hose and exhaust for the flue were cut, the unit would slide back and screwed into place.


For the exhaust flue, a 4" dryer vent was fastened to the flue with pipe clamps. A larger 6" hole was cut and flashed with furnace duct metal. To keep out drafts around the 4" vent, a special high temp caulking used for wood stoves was pumped into the cavities. Spray foam was used in other spaces where there was no contact with heat.


4" Dryer vent through wall

View from the exterior

The IKEA pantry is pushed to the wall

Since the  propane RV refrigerator project was completed, it been wonderful. We use it all year and it is really efficient on propane gas. A standard BBQ tank will last 2 months. My spouse is happy and in turn, everyone is happy.

Friday, March 15, 2013

Build a Wind Turbine from a Cordless Drill/Driver- v2.0
Unknown1:46 PM


Build a Wind Turbine from a Cordless Drill/Driver- v2.0
This video just covers the basics and like many of the Cedar Workshop videos, it's for learning and having fun. But, it could make a trickle battery charger, remote water pump or run some LED lights.
A neighbour gave me one of their 12 volt cordless drills. Eventually, the batteries lost their charge and  had to purchase a new battery from the hardware store. But, as usual, a newer model was on the shelves, this model of drill and battery was discontinued. After watching another video done be the Doug Daniels, I decided to take the drill apart and see if I could make a mini wind power generator. 

Started out removing the leads to the trigger, made a hub from a 4-1/2" v-belt pulley, attached blades, and ran some drill press tests. The factory gearing on the small DC motor presented some interesting results. To simulate a high speed wind turbine, the cordless drill was attached to a drill press running at 792 rpm. The results were interesting. The low (driver setting) produced 4+ amps and just over 18 volts, but was hard to turn. The high speed setting (for drilling) produced a low 6 volts and a dismal .8 amps. 

The next step is to mount it to a pole and get some real world feedback.

Enjoy!


Wednesday, March 6, 2013

VAWT Made From Wood Siding
Unknown11:27 AM


 This video and blog post is about a Vertical Axis Wind Turbine (VAWT) made from mostly a wood called  Western Red Cedar. It has contains images from the first attempt 2 years ago and video update of of the second attempt with modified blades/airfoils.

The parts where various materials for around the shop:

- Blades (and struts) from 1 x 8 Bevel cedar siding lumber


- Hub- the top and bottom wood circle from a cable spool

- 1 inch outside diameter aluminium shaft

- Hub- 1 inch Floor flange

- Hub- 1 inch x 1-1/2 inch Reducing Bushing

- Two rare earth ring magnets (ebay), thin vinyl sheet for the blade scoops and assorted screws.

One of the blade scoops was on the VAWT was damaged slightly when it "moved" by a family member.

Future plans: Brace the struts, upgrade the shaft, create a better mount and somehow add a generator. Hopefully with the second tower in the making, I get the chance to test it out.
Shaping the blades

Adding struts to the hub

Right angle bracket for the blade

Close up of cedar strut. Cut from the thicker section of a 1 x 8 cedar siding plank

Shows how it was joined

High tech level system for blades. Sits on a spine of a VHS  tape case.

Birds eye view of the blades shape and mounted


Sandwiched the struts between the plywood cable spool  

Shelf bracket for more support

Top of dismantled cable spool

Another shot of the shelf bracket. Wanted to allow space for blade angle, etc.

Shaft, locking collar and magnets inserted on the shaft. Ah, yes, I did add an extra bearing just underneath the reducing bear. Maybe a bit of my over engineering!

The reducing bushing fits nicely into the floor flange. Tighten and you have the plywood, struts all wedged together. Plus the shaft and slide inside. 

Erected on tilt up wind turbine tower. 

Not too high, but I wish it was! My noisy neighbour would report me for some height violation bylaw.

At least it looks scary...

Can't really see it from the road. The trees really kill the wind.

Adding the airfoils to create a Lenz style of airfoil


Tuesday, February 26, 2013

About the Cedar Workshop
Unknown11:21 AM


Stain-brush-and-Scott

The Cedar Workshop was originally an online company that sold cedar adirondack chairs and pergolas. Due to lack of time and a career shift, the company was closed. The owner, Scott, continued to putter around in the shop. After a few years, he purchased a remote cabin high in the mountains and this presented an opportunity to build and learn. Since the cabin was a second dwelling, many of the projects had to be completed with limited tools, help and materials. Most of the materials were recycled or scavenged. Thus, the Cedar Workshop was revived from the “saw dust” and modified to share information with other people in a similar situation.

Tuesday, February 19, 2013

EVA or or Sylgard 184 for solar panels
Unknown3:46 PM


The following is based on my experience and may not have the same results on your location.

Two Coats of Sylgard 184


80 Watt panel with no back yet. See how transparent it is? Notice the air bubbles. Difficult to remove.


I've used EVA film and Sylgard 184 encapsulate. 
EVA- $20/yard 
For a 24" x 48" 60 watt panel- $30
is cheaper and a tad more work, but easier to position. Best to have some kind of kiln or oven to place the solar panel in. But, for a larger 24" x 48" panel, have to use a plug-in-the-wall hot air gun. If the EVA is not heated up hot enough it can unstick and peel off. I was told to put the mikly color down (but it's difficult to see the difference) Can't remember the temperature setting it was at, but it was around 120 degrees (med-high). Make sure to ask the EVA seller what the temperature range is... don't want to have a fire.  
Best to try it out on a small panel to get the feel of it. If you like, I can send you a sample to play with.  

Sylgard 184- Expensive $50 for a less than a quart.  
For a 24" x 48" 60 watt panel- $100 - 200  
The Sylgard 184 is the cats meow. It's main purpose is for exterior electrical encapsulation, keeps moisture out and is not vinger-based acidic (like clear caulking). Remains flexible in all types of weather and when poured in layers, it work really, really well. It's a 2 part solution which is mixed together and then poured over the back side of the cells. Has the constancy like corn syrup. Very hard to clean up. Through trial and error, pour a container on the glass, lay the strings face down and pour another container over the backside. One coat on the back in minimal for a large panel. In my West Coast climate, it took the panels 3 days to set.  Made by Dow Corning

Note: I built my DIY solar panels about 3 years ago. It was a cheaper way to go at that time ($600/120watt panel in Canada). Sylgard is the best, but expensive for multiple large panels. But, all the DIY panels I have built, encapsulated in Slygard 184 are still working.    

I'll try to post some pics on my blog for you to see. Feel free to contact me for pictures.

Wednesday, January 30, 2013

The plan to build a wood fired cedar hot tub
Unknown3:34 PM


Western Red Cedar four hoop hot tub handcrafted by Forest Lumber Cooperage Ltd.
Picture courtesy of Forest Lumber & Cooperage Ltd
For the last couple of months, I been researching on how to build a wooden hot tub. If you haven't seen one, it's a six foot round barrel about 4 feet high. Normally made from vertical laid Western Red Cedar planks that are fitted together. A heavy duty banding is wrapped around the outside to keep the vertical planks from bursting. A snorkel style of wood stove is used to heat the water up. The stove sits just under the water line. Of course, I could pony up the $3500.00 a buy one. But, that's not in the budget. The deck at the cabin comes first.
Anyway, after travelling on the internet, came across a story about another dude that wants to do the same thing...
"Hi folks, I am considering taking on the construction of an outdoor cedar hot tub. I want to build it using a joint that I have seen in use by kits I have assembled. The joint is called a canoe joint and it is used on 2x6 edges. I looked online to purchase a shaper/router bit set to achieve this joint and have only found ones that have smaller radius than i require for my staves. Any help you can provide in a source for this bit set would be very much appreciated. Thanks, Jerry"
round-nose-profileSo, I'm like cool. I'm not the only one. Found a post response and he/she suggested a Round Nose Router Bit by Freud. Freud makes really sweet saw blades, but I haven't tried the bits yet. Looks like I'll head down to the local Windsor Plywood store and pick one up.


Tuesday, January 22, 2013

Pole mount solar panel (from scrap materials)
Unknown11:57 AM

Back in July 2011, I was sitting out front the cabin having my morning coffee and starring at the fixed solar panels. Figured there was a better way to catch all the rays of sun with a rotating solar panel. After a few quick sketches on a scrap piece of paper, I went to the shop and found a bunch of left over plumbing parts and aluminium angle iron. The mount is based on a 1" galvanized "T" that has two arms and a body (pole) that is treaded into a 1" pipe union. The union sits nicely on top of a patio umbrella metal pole, which is inserted into a wider galvanized fence post. The left and right "arms" are standard 24 inch lengths that thread into the Tee. A U-Clamp was used to secure the pipe to an angle iron.The angle iron was bolts with stainless steel bolts to the solar panel frame. No really high tech, but it works. There is just enough friction on the union that the wind does not spin the panel, but can be easily turned by hand. The solar panel can be adjust up or down to match the summer or winter latitude.  See the video below!

Thursday, January 17, 2013

cedarworkshop.net- we've got a website too!
Unknown8:07 AM


Looking for more information about solar panels, wind turbines and cabin reno projects?
No prob!
Pop by the website at www.cedarworkshop.net  

Wednesday, January 16, 2013

Radio Controller Forest Service roads
Unknown9:48 PM

If you travel on any back roads in British Columbia, you are required to have a UHF radio that is "tuned" to that road. That way you can communicate with the logging trucks. Here's an example of a frequency "153.23". Your radio would be pre-programed from the dealer.

-->

Monday, January 14, 2013

Talking about solar stuff with a rockstar
Unknown3:11 PM


-->

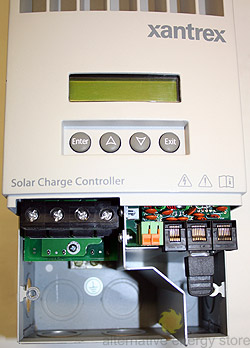
Xantrex XW MPPT 60A Solar Charge Controller, XW-MPPT60-150Had an amazing discovery on the weekend. We hosted a birthday party for a good friend and one of the guests, worked for the company that produces Xantrex inverters, charge controllers, battery chargers, etc for off grid use. (I almost fell off my chair!) For someone like me, that's really into the alternative energy, it was like meeting a rock star. Since we were sitting at the dinner table, enjoying a tasty dessert, I had to hold off and not get to excited with the questions/answers. Xantrex makes really good products, and for me, it's a local company. As we were talking, my spouse and close friends were making fun of us talking about "solar stuff". I had briefly mentioned I had a YouTube channel and do reviews/how to videos for different products. I got a nod, but, afterwards felt like a geek mentioning it. Sadly, the guest had to leave for family obligations.

I didn't get a chance to ask him some details about the Xantrex MPPT Charge Controller.  Below is a few pics of the charge controller. I'd say it right up there with the Morningstar Tri-Star TS-60 charge controller. The good news is I could switch the Morningstar into Diversion mode to divert the excess power to the two 100 watt transistors. Hmm...

Sunday, January 6, 2013

Simple (and cheap) wind turbine tower from building materials
Unknown9:47 PM

Simple (and Cheap) wind turbine tower from building materials

If you need a wind turbine tower and the build budget is tight, this video should help. My tower cost about $30.00 and it's 25' tall.
The original idea came fro Mike Davis. (The guy is a THE DIY Wizard. See link below)
I followed Mikes advice, and modified the design to be adapted for my cedar deck. I decided to see if I could savage parts from a used building supply depot. The materials came from fencing, plumbing and electrical departments. I had noticed that  horizontal pipe used for the top/bottom of chain link fence. It fit nicely inside (with very little play) over top of a 1" galvanized metal EMT. If you look around, I'm sure you'll find some with minor dents for a $7 - $9 each for a 10' section.  I picked up about $30.00 worth of material and took it home.

So, for the stand, the feet are (2) 1" floor flanges, legs (2) 6" of pipe, (2) elbows, (2) 6" pipe, (1) T-intersection and about 36" of 1" pipe. The fencing pipe slips over the water pipe. Then depending on your height, the 1" EMT fits nicely inside and the fencing pipe. Then you alternate the lengths to create the tower. For guy wires, use the clamps in the fencing section for the ropes. Sounds complicated, but I'll see what I can find for pictures.

In an ideal situation, would takes 2 people to raise the tower. But, if you use a pulley and a heavy counter weight, 1 adult can do it. Just make sure to have your guy wires ready.

All the credit for the wonderful design goes to Mike Davis. He makes a ton of really cool projects. See his web site at http://www.mdpub.com/index.html
http://www.youtube.com/watch?feature=player_embedded&v=R0oFnk17zbE

-->